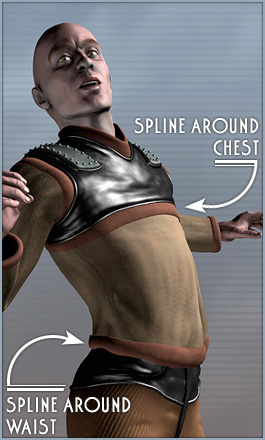
 In spite of what I said yesterday about how much I hate skinning characters to their skeletons, every now and then I do get to smile. My latest trick is to skin the characters not only to bones, but to splines that are (sometimes) also skinned to some of the same bones.
So when Harry’s chest and waist were getting pulled back and forth between warring bones I extracted some splines from his model, skinned those splines to parts of his skeleton, and added the splines to the bones that control Harry himself.
Then I adjusted the influence of those splines to even out the skinning and lock down the chest and waist lines – which are structural parts of his clothing, among other things.
This is a lot like what I’ve lately been doing with faces. The 3DS Max UI does a lousy job of displaying the splines’ envelopes, but since I can see the results on the model that’s not a huge problem.
The biggest downside seems to be that if you intend to edit the splines, as I’m doing in my faces, it’s not a great technique for animation because it’s hard to keyframe the shapes of the splines*. I guess you could create morph targets for the splines, which is a thought, but I so rarely do animation that I’m not worrying about that for now.
One reason this might be nice for animation, though, is that you can use the splines to simulate the way surfaces like skin or cloth slide over the more rigid surfaces they cover. That’s sort of what’s happening here already.
*Oh, there might be a way, but I don’t seem to be clever enough to work it out.


